Posts

Showing posts from December, 2022

Painting prep part 2: sanding the deck

Image
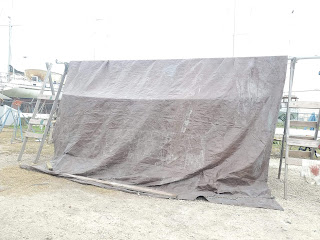
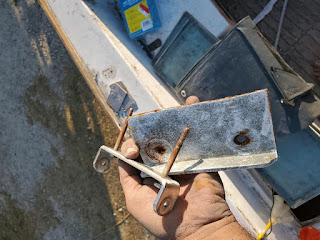
Now that the weather is nicer & more suitable for restoring old sailboats, I returned to making a lot of dust by sanding Cantara's deck clean of all old non-skid and paint in preparation for a new boat paint job. One of the curious discoveries after sanding away the old deck paint were the aluminum plates under the stern cleats. Not sure who put them there or why; they were only lightly glassed-over so I am guessing they were not meant as backing plates to the cleats but were top plates instead? Are they original to the design? The pink filler matches that around the rest of the stern deck suggesting these were original to the boat. Cape Dory famously used mild steel backing plates for chainplates but flush aluminium top plates for stern cleats? Doesn't make sense. Anyway the whole stern deck is going to have to come off along with these plates due to extenive moisture damage around the deckplate holes, which extends all the way down to the cockpit seats too. Sanding the or

Painting prep: Tenting, screeding, and removing the toerails off of an old Cape Dory Typhoon sailboat

Image
During the course of the day, I decided to tent the boat by draping a large donated tarp over her, using the mast as a beam. This is meant to keep the rain and morning dew off the boat and supplies o I can get started working earlier. After the old paint was stripped off Cantaora's hull and the old holes for thruhulls were all glassed-in, it was time to start prepping the hull surface for fairing and painting. The actual painting of a boat doesn't take nearly as much time as preparing the surface beforehand. First: fix damaged areas of the hull and fill in large holes.  I had to deal with the cosmetic damage at the bow where the boat had scraped against her ill-suited trailer, according to the prior owner. A large chunk of fiberglass has been gouged out, but this also happens to be the strongest point in the hull with very thick fiberglass so the damage was cosmetic.  Fixing the gouge involved sanding back the area and putting several layers of fiberglass into and over the goug

Freezing Christmas, with bling for my boat

Image
  With temps falling to freezing for the next few days for Christmas, all work is stopped. Epoxy doesn't cure well below 50 degrees F and I don't work well at that temp either.  The work delay is frustrating but I spent the time opening the boxes for some pretty bronze fittings I bought online for my girl. Cantaora came with a batwing-style stern light in aluminum that literally fell apart in my hand as I was taking it off, so that will be replaced with a bronze batwing style stern light. It took some effort to locate one with a glass lens; plastic lenses on these vintage light fixtures tend to have clouded-up over time, potentially reducing the light's visibility which is set at a min. 2 nm by law. Note the three bronze padeyes. Two will be used for the sheeting blocks, and the third will be a strong point to connect a tether in the cockpit. I also got a nice bronze bi-color bow light. The separate port and starboard nav lights on the standard Typhoon are located on the ca

Stripping old bottom paint from a Cape Dory Typhoon

Image
The yard workers got around to taking Cantaora off her ill-suited and broken down old trailer onto a few jackstands. This gives me easier access to the boat bottom to start stripping her old bottom paint too now that her topsides was completely stripped of old paint. Stripping a boat bottom of old anti-fouling bottom paint is a miserable, time-consuming job so I've learned to first get almost all the old ablative paint off with a chemical stripper called Peel Away. The stuff is not cheap but the cost evens out if you consider the yard time that is saved. I made a point of applying the stripper a little heavier around the areas that are harder to sand, including tight curves. Sold in kit form, Peel Away is highly caustic water-based putty that is spread on the hull bottom over the ablative paint (I apply it with notched trowel first before smoothing it all out) then covered with 3'x3' plastic sheets (comes with each kit) and left overnight.  The next day, the caustic putty a

Stripping the old topsides paint off a Cape Dory Typhoon

Image
While waiting for the yard to put Cantaora on jackstands, I started stripping off the topsides paint. I knew the whole boat would require a complete new paint job, so I went with an aggressive 40 grit drum on a burnishing sander. The boat had been painted with whatcseemed like outdoor paint, using a thick heavy brush. It definitely needed to go. This is my new favorite tool, I call her Dusty. Sanding of old paint is a miserable job when restoring boat so any way to get that done faster suits me just fine. Dusty doesn't leave the same smooth and even surface as the Bosch 6" orbital sander but it gets the job done, and fast. Whatever divots are left are dealt with later when fairing the hull bit I did go over the stripped topsides once more with the Bosch and 80 grit sanding discs. Dusty made quick work of the old paint, stripping her topsides down to original gel coat in less than an hour for each side. I switched the handle position from what's shown in the video to positi

Restoring the cockpit sole on a Cape Dory Typhoon, Part One

Image
While removing most of the cockpit fittings on Cantaora, I noticed the cockpit sole was so soft that it felt dangerous to step on, making it a priority item to fix contrary to my general plan to avoid fixing anything that can be addressed later when the boat is in the water (fixing up an old boat is not an easily pre-planned, linear process.)   My boat came with 12" long teak tiles covering the sole, stuck on with generations of caulking in an ultimately failed attempt to block leaks. It covered-up a lot of issues and had to go. Generally IMHO teak decking is excess weight, and too hot under bare feet in the tropics anyway, so I had no plans to salvage or replace it.  Thankfully there was no 3M 5200 used and the teak came off the cockpit sole easily with a pry-bar. In some places even the bottom fiberglass layer was compromised. The oval wood cover piece around the rudder shaft popped right off after I removed the tiller head (and discovered an issue with the bolt that was suppose

Removing deck fittings on a Cape Dory Typhoon

Image
 All the fittings had to come off before I could repaint Cantaora; many of the installations were poorly done in the first place, causing moisture damage to the deck. Luckily there weren't too many things to remove; the hardest part was dealing with the usual stripped screw heads, and problems getting access to nuts behind the fitting with a wrench while simultaneously holding onto the bolt head too Below-deck access to the deck-mounted chainplate bolts is through a couple of holes cut through the liner. The previous owner had covered these holes with two giant stereo speakers. The chainplates came off easily; the old mild steel backing plates were rusted. The backing plate for the center-deck cleat was also easily accessible but was completely rusted. I tried to save as much of the teak as I could but some pieces were just hopeless. The teak coamings on a Cape Dory Typhoon is a well-recognized characteristic but I don't think that my coamings are salvageable; one has a long cr

Cape Dory Typhoon: clean-out, discoveries

Image
 While waiting for the yard to take Cantaora off the old trailer and onto jackstands, I had a chance to clean out all the stuff left in her by the previous owners.  This included moldy old cushions, some sails in bags (didn't get a chance to check them out but I don't have high hopes for the sails considering the state of the rest of the boat) old fenders etc. The most interesting thing I found aboard was this old tiller pilot, the Mate made by Sharp in the 70s. It was a granddaddy of modern tiller pilots, weighs a ton, and has a battleship gray metal exterior like a piece of military hardware. There are knobs marked yaw, pitch and roll on the unit, and it came with a crate of attachments. I did not find much technical info about it on the Web, and sent it off to metal recycling.  This does bring up the thought of getting a new tiller pilot, probably a Raymarine ST2000. A quick tour of the boat interior: The opening portlights seem a little obtrusive and "off road capable